GitHub Pages with Jekyll: Scratch up your own blog
The beginning is always hard. I also went through the difficult procedure of getting started with my own blog. So I am taking this opportunity to try to make it a bit easy for others in the same boat.
If the title didn’t already explain, this article is a 101 for setting up your own blog, right from coding to hosting and serving with a domain name.
I’m assuming here that:
- You know the basics of web development i.e. programming with HTML, CSS, and javascript. (Not necessarily to follow this article but for maintaining your blog, you will need to know them.)
- You use GitHub or any other version control system, not necessarily be knowing what version control is(just in case). If you didn’t use GitHub before, then please first go through this beginner’s guide and get familiar enough to be able to set up a repository and maintain it.
- You understand templating in web development and of course, understand OOPS.
Note: I use ubuntu 16.04.
Update(02-07-2019): I now use ubuntu 18.04 so have updated the installation instructions recently according to 18.04.
There are two things to keep in mind,
- The process is easy, only when you follow smartly.
- Google Is Your Friend if you get stuck somewhere.
Note: I will only describe the bare minimum for setup stuff, for the rest, there are official docs to follow. Nothing works better than them, Believe me.
Let’s begin!
1. Setting up GitHub Pages!
Before getting into the development of the blog, we are going to set up the hosting first as it isn’t going to require much effort. We are going to leverage the free hosting provided by GitHub in the name GitHub Pages.
It is as easy as creating a repository. Follow these steps:
- Create a new repository with the name
<username>.github.io, whereusernameis your GitHub username like mine is “curioswati”. -
Clone the repository to your local filesystem with:
git clone https://github.com/username/username.github.io
(Don’t forget to replace username with your GitHub username.)
2. Setup your custom domain!(Optional)
Buy a domain name from some Domain name provider(the how-to is out of the scope of this post). Follow this GitHub guide for setting up your custom domain with GitHub. The procedure in short is,
-
Create a CNAME(the name of the file is CNAME, no extensions) file in the root of the repository. It should contain your domain name, as mine contains: “swatij.me”. You can create CNAME from GitHub’s Web UI by following the steps:
- Go to your repository
<username.github.io>. -
Go to Settings.

-
Under “Custom Domain”, write your domain’s name and click “Save”.
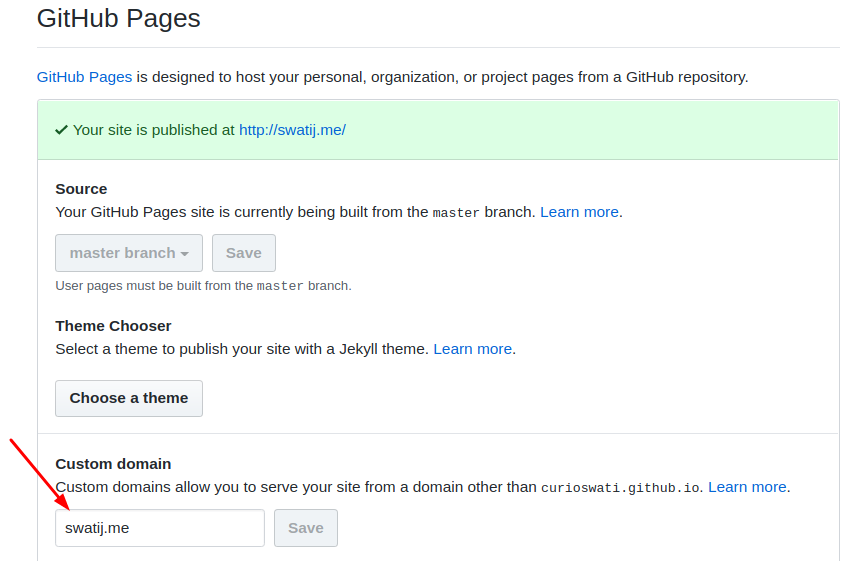
After this, you will see a message saying that “CNAME was created”.
- Go to your repository
-
Create 2 records in the DNS by following along with this post. The DNS changes can take a full day to reflect at max. So you would have to wait for a day at max to see your site running on your
<domain.com>. Till then, you can see it at<username.github.io>. Which will also take at least 10 minutes after creating the repository to go live(before that, it will show a404on the page).
Later, when DNS changes are up, your<username.github.io>will also redirect to your<domain.com>.
So, the extra setup is done, we have our blog hosted on GitHub and served at a <domain.com>.
But right now it’s blank as we have nothing in our repository to be shown.
We need to convert it to a blog now. So let’s move on to the next and the most important step: “Development”.
3. Introducing Jekyll
Jekyll is a static site generator. Yes, it generates “static” sites. That’s why you can’t use it for full-fledged websites with many catching features. But that’s what it is not intended for. The introduction of its site includes the word “blog aware”, which itself tells the story. I for myself never regretted using it in past 4 years. It takes some extra efforts to get something new in, but that’s worth the effort. Because the selling point is, “Your content is yours forever”. It uses Liquid(templating language) to render the content which can be written in any of HTML or Markdown.
4. Installation and Configuration for Jekyll
I. Installation
You have 2 options:
- Either download this gist, extract and run the python script.
- Or follow the documentation.
The gist mentioned above does the following:
- Checks for the operating system version (the commands will work with Debian based Linux system only).
-
If the install is instructed, runs the following commands:
Install build dependencies
(for ubuntu <= 14.04)
sudo apt-get install gcc g++ make build-essential software-properties-common python-software-properties zlib1g-dev(for ubuntu > 14.04)
sudo apt-get install gcc g++ make build-essential software-properties-common zlib1g-devInstall ruby 2.4.0 or above
(you may already have Ruby installed on your computer. You can check inside the terminal by typing:
ruby -v.)sudo apt-get install ruby-fullInstall Ruby Gems
  echo '# Install Ruby Gems to ~/gems' >> ~/.bashrc
  echo 'export GEM_HOME="$HOME/gems"' >> ~/.bashrc
  echo 'export PATH="$HOME/gems/bin:$PATH"' >> ~/.bashrc
  source ~/.bashrc
Install latest Jekyll(3.7.3 at the time of publishing.)
gem install jekyll bundler -
If uninstall is instructed, runs the following command.
sudo apt-get remove ruby* ruby*-dev rubygems
So, you can manually use these commands to install Jekyll with ruby or can use the gist or docs, whatever you prefer.
Check if Jekyll was installed by the following command:
jekyll --version
It should show you jekyll x.x.x.
here are some troubleshooting tips if you need them. If you run into some new kind of issue, do consider reporting it here.
II. Configuration
First, lets’ create our blog!!
-
Change the directory to your newly created repository and type the following command from inside.
jekyll new . -
You have two options from here on, I am not getting into details and just guiding you through the easier one. Remove the file named
Gemfileand then start the development server.jekyll serve
Now let’s see it running, navigate to http://localhost:4000 from your browser.
You can see an introduction page.
The other option that I didn’t mention was to use the gem based theme, which will require you to install bundler. You can find out more here and the basic usage here.
5. Let’s talk Jekyll
We’ll cover some concepts here so you can have a head start. Later on, you can always go to the docs for details.
But before that, create some directories for important files that I’m going to mention below.
Your directory structure should look like:
username.github.io/
    |- _posts/
    |- _layouts/
    |- _includes/
    |- _config.yml
    |- index.html
    |- static/
The _config.yml
This file is the communication link between you and Jekyll. You will see when you open it.
It deals with everything that you will ever use with Jekyll. For the starters, fill in your relevant details.
These are site variables which will be accessible elsewhere with site.<variable_name>.
So you can use this file for site-wide configurations.
Mine looks like:
title: My FullName
email: my_email@domain.com
description: > # this means to ignore newlines until "baseurl:"
  Site Description.
baseurl: "" # the subpath of your site, e.g. /blog/
url: "http://username.github.io" # the base hostname & protocol for your site
twitter_username: my twitter_handle
github_username:  my github_username
The Front Matter
It is a very cool feature of Jekyll. It is the content enclosed between --- at the beginning of any file.
You can specify the front matter by adding the following at the beginning of your post page.
---
layout: default
title:  Title for the page
date:   YYYY-MM-DD HH:MM:SS
tags: ['tagA', 'tagB', 'tagC']
categories:  category subcategory
permalink: /:categories/:title
---
The --- are very important!!
The content inside is self-explanatory. The “categories” is a very useful feature.
Categories are used to classify and organize your posts in directories in your repository by Jekyll.
From the above front matter, jekyll will create a directory hierarchy like /_site/category/subcategory/post.html.
Everything is well organized already.
Then you can see “permalink” here, it will automatically take the category names, separate them with / and prepend them
to the title and form a permalink for the post.
So your post will have a link similar to http://username.github.io/category/subcategory/title.
“Tags” are what they are elsewhere.
You can organize your posts according to tags by mentioning them like this in the posts and then creating lists where you can iterate on tags
with post.tags.
“Layouts” deserves a section, so follow along.
The _Layouts
“Layout”, is similar to templates in frameworks’ ecosystem.
They are good for reusability as you don’t have to add same code blocks(take head, header and footer etc for example) in each HTML file,
instead, they are plugged into all of the HTML files that inherit a layout which has them.
The default layout for our blog will look something like this:
Create a file named default.html inside the _layouts/ directory with the following content.
<!DOCTYPE html>
<html>

  { % include head.html %}

  <body>

    <div>
      { % include header.html %}
    </div>

    <div class="page-content" style="margin-bottom: 15%; margin-top: 7%;">
      <div class="wrapper">
        { { content }}
      </div>
    </div>

    <div>
    { % include footer.html %}
    </div>

    <script src="/static/js/jquery-1.11.2.min.js" type="text/javascript"></script>
    <script src="/static/js/bootstrap.min.js"></script>

  </body>

</html>
The extra space here "{ %" and here "{ {" is intentional to avoid having them interpreted by the engine.
You can create many other layouts while extending this default one.
for example, here is a layout for post detail page:
---
layout: default
---
<div class="post">

  <header class="post-header">
    <h1 class="post-title">{ { page.title }}</h1>
  </header>

  <article class="post-content">
    { { content }}
  </article>

</div>
Here, there is again a { { content }} block, which will be filled by a post that is using this layout.
So, now you might be getting the picture. The first layout had a { { content }} block which shall be filled
in by this page template and then there will be a “post.html” which will fill in the { { content }} block.
This is how “inheritance” is leveraged here.
The _includes
In the above layouts, you saw some _includes blocks.
Those include blocks are different HTML modules kept inside _includes/ directory.
So whenever you want to attach a block of code in multiple places, you put it inside an HTML file in the _includes/ directory
and then can use it with { % include filename %} wherever you need it.
So, as you can see in the default layout that we wrote above, it includes footer.html, head.html, and header.html.
So you need to create those files and put them inside _includes/.
I have used it also for “google analytics” script, “reading time”, “comments” etc on my own blog.
The head.html should contain the head block of your HTML page i.e. it should have title block, meta tags, and css imports etc.
The header.html could contain the site header with navigation that should list various other pages of your blog.
The footer.html can have links to your other profiles and the description for your site.
One more important feature that I haven’t talked about is “collections”. Just briefing it here. I’ll wrap up Jekyll with it.
The collections
Collections are useful when you have to show some data that has many items with similar properties.
The best example for me to put it right now is GitHub Projects.
So, for example, you want to showcase your GitHub projects on your blog/personal website.
The data that you want to show might follow a pattern here, for example,
the data can have some common fields among all items(projects) i.e. project name, project URL, some description, an image etc.
So one way to show them on the site is creating an HTML page and filling in all the details one by one by repeating the blocks
with all the content.
The other, but better way is to use “collections”.
Let me show how to do this.
-
Create a directory named
_projects/inside the root of the blog directory. You can keep any name that you want to give to your collection. Just keep that_at the beginning. -
In your
_config.ymlfile, add a block for collections like this:
title: Full Name
... # other fields
... # other fields
... # other fields
collections:
- projects- create
.mdfiles for each project with the details filled in. For example,project1.mdcould look something like this:
---
name: "Project 1"
repo: "https://github.com/username/project1"
gh-page: "/project1"
liveurl: "https://project1.com/"
---
and so on for all the projects.
- Create the page on which you want to show the projects, say
projects.html. In that file, you can iterate over your collection of projects. Like this:
{ % for project in site.projects %}
    <span>{ { project.name }}</span>
    <span>{ { project.repo }}</span>
    <span>{ { project.gh-page }}</span>
    <a href="{ { project.liveurl }}">live-link</span>
{ % endfor %}
This way, maintaining that page becomes easier, all you have to update is those .md files, whenever the data changes.
Refer collections in Jekyll’s docs for more.
I have been using liquid tags throughout the article, If you want to learn about them(which you have to), please follow Jekyll’s template guide.
Then we have variables.
I have just scratched the surface, jekyll has many cool features that will amaze you. You can refer the docs for all of them. There are some more useful things here.
6. Writing Posts
So, all the background scratched, now we move on to action. Let’s first fill in the index page to list our posts when we create them.
Put this inside the index.md or index.html whichever you have:
---
layout: default
---

<div class="home">

  <h1 class="page-heading">Posts</h1>

  <ul class="post-list">
    { % for post in site.posts %}
      <li>
        <a class="post-link" href="{ { post.url | prepend: site.baseurl }}"></a>
      </li>
    { % endfor %}
  </ul>

</div>
Inside the _posts/ directory, create a file with whatever title you want to give to your post.
For example, first-post.md or first-post.html.
Put the front matter at the beginning. It could look like:
---
title:  "First Post with Jekyll"
date:   2018-03-23 12:30:00
categories: category1 subcategory1
permalink: /:categories/:title
---
Below the front matter, write your posts in Markdown or HTML whichever you prefer.
You can then see the post listed on the homepage. It will have the permalink as http://username.github.io/category1/category2/first-post
If you followed along, the final directory structure should look like:
username.github.io/
    |- _posts/
        |- first-post.md

    |- _layouts/
        |- default.html

    |- _includes/
        |- head.html
        |- header.html
        |- footer.html

    |- _projects/
        |- project1.md
        |- project2.md

    |- _config.yml
    |- index.html
    |- projects.html
    |- static/
For keeping your resources, like css and js scripts and fonts, you can put them inside the static folder and use
relative links like static/css/bootstrap.css for linking them in HTML.
So this is it for jekyll. As I said, I have just mentioned the bare minimum for you to get started.
You can find other features and play with them while moving on with your blog.
You can find the code for my own blog here.
7. Deployment
In case you are not using “github-pages” and want to deploy your blog elsewhere. Jekyll has it all covered too. you can visit the Deployment Page for all the details.
So, we are done with the initial blog setup, you can check out the references for more.
I’ll be writing about other features that I gradually added to my blog, in upcoming posts.
Stay tuned!
Originally published on: [https://www.zeolearn.com/magazine/github-pages-with-jekyll-scratch-up-your-own-blog]
Comments
Leave a comment